

The following tutorial will help you to relocate your Users Folder in Windows 10. This operation is never recommended by Windows but you can go for it, since it has a lot of advantages. It changes the value of one internal Windows 10 environment variable which means taking care for all files and folders and at the same time let you decide which drive to choose for saving the Users files. The procedure can save a lot of space in C: drive and you won’t need to take the hazard of cutting and pasting to separate drives. The process is simple, robust and reversible. Check out the steps below.
I. Create an unattended answer file (relocateusers.xml)
Windows 10 has a built in tool called the System Preparation Tool (Sysprep) which can be used to move location of the users folders. The sysprep file is a little file which needs certain instructions for execution. An unattended answer file is an .XML file which is required to give instructions to the sysprep.
Now paste the following code in Notepad as shown in the screenshot below. Copy the code from below link.
relocateusers code (click to see)
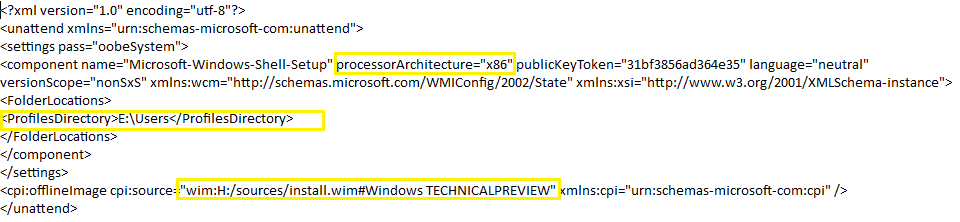
It is very important to note that certain changes are to be made in the code which are based on the version of OS you are installing.
1. If you are using a 64 bit Windows 10, then put amd64 for ProcessorArchitecture. We are using 32 bit Windows 10, so here the value is x86.
2. The ProfileDirectory tag implies to the new location where you want the Users folders to bee moved. Since we want the folders to be moved to E: drive, we have kept the value as E:\Users.
3. Now coming to “wim:H:/sources/install.wim#Windows TECHNICALPREVIEW” line. It is indicating the install media location, separated with #, the Windows version is to be written correctly (Windows TECHNICALPREVIEW for Windows 10 Tech Preview). The installation media must be present during Sysprep. We have it in H: drive. You may change the drive letter in this .xml file accordingly. You may also mount Windows 10 installation ISO image onto a virtual drive and then provide the location of the install media in this script.
Now save the file as relocateusers.xml and save it to root directory of any directory except the C: Drive. We saved it to root directory of E: drive.
II. Run Sysprep
1. Now right click on Start button and select Command Prompt (Admin).
2. To ensure that WMP Network Sharing Service is stopped, give the following command:
net stop wmpnetworksvc
3. Now type and enter the sysprep command:
%windir%\system32\sysprep\sysprep.exe /oobe /reboot /unattend:e:\relocateusers.xml
As you hit Enter the Sysrep will run with the instructions mentioned in relocateusers.xml file and will perform an OOBE boot (OOBE = the first boot of newly installed Windows) and then you have to perform the initial setup steps that you have performed while you have installed the Windows 10 (like choosing settings, creating new user account etc.).
Creating new user account may confuse you. But don’t worry, your previous or existing user account is safe and you can access it later. OOBE boot needs to create a new user account so you have to create one. If you try to create previously existing Local or Microsoft accounts, you will get an error, it implies that those accounts are already there.
III. Steps to upgrade Windows 10 to the next build when Users folder is relocated
After you move the Users folder to any non-default location, you will not able to upgrade Windows 10 to the next build. To fix this you have to relocate the folders to it’s default location. Follow the steps below.
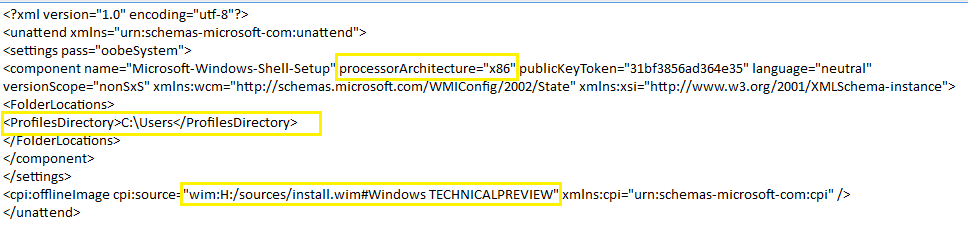
1. Now paste the following code in Notepad as shown in the screenshot below. Copy the code from below link.
relocatedefault code (click to see)
Save it as E:\relocatedefault.xml. Please refer to the above steps to know what changes must be made to your code.
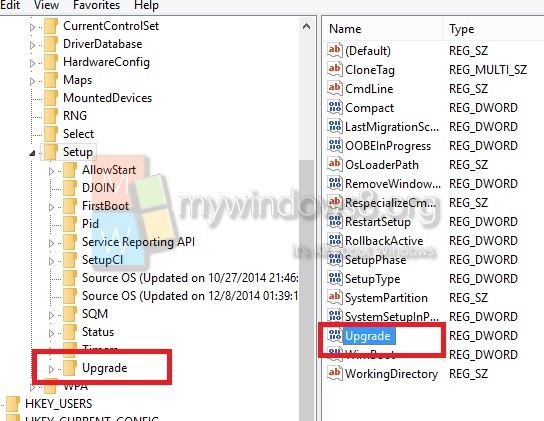
2. Now open the registry editor by typing regedit in Run window and enter. Now navigate to the following location HKEY_LOCAL_MACHINE\SYSTEM\Setup. Delete both the DWORD Upgrade (right pane) and KEY Upgrade (left pane). Confirm deletion if any warning message arises.
3. Now navigate to the following location HKEY_LOCAL_MACHINE\SYSTEM\Setup\Status\SysprepStatus. If either DWORD CleanupState or DWORD GeneralizationState has any value other than 7, update the value to 7. To change it double click on the key and enter the new entry.
4. Now open Elevated Command Promptand type slmgr /dli and hit Enter to open Software License Manager.
5. Close the registry editor and you are done. You can now upgrade to the next build.
About Nick
Nick is a Software Engineer. He has interest in gadgets and technical stuffs. If you are facing any problem with your Windows, feel free to ask him.
I moved the Users folder to D drive by following the steps mentioned above in my Windows 10 PC. However after moving the folder to D drive, the system became slow and less responsive. Even the start menu opened very slowly. I had to move the folder back to the system drive and everything started working fine again.
Any idea why?
The same thing happened on my PC. I’m not sure why, but I’m just moving my individual folders such as Documents instead.