In Windows 10, multiple computers are connected by your Live ID. If you are using multiple devices of Windows 10, say a computer, a laptop, a tablet, if you change the screen resolution in the main computer, the change is affected in the other devices as well. Not every device are compatible with similar resolution. So, if same resolution is applied on every device, some device screens will look bad. Previously, Windows allowed users to tweak the screen resolution via the Control Panel. But now Windows 10 has separated the settings from Control Panel and has integrated it with the Settings feature. If the screen resolution in one of you Windows 10 devices has changed for the worse, then you will need to set screen resolutions for multiple monitors. The following tutorial will let you set screen resolutions for multiple monitors in Windows 10.
Steps to Set Screen Resolutions for Multiple Monitors in Windows 10
1. Open Start Menu and go to Settings.
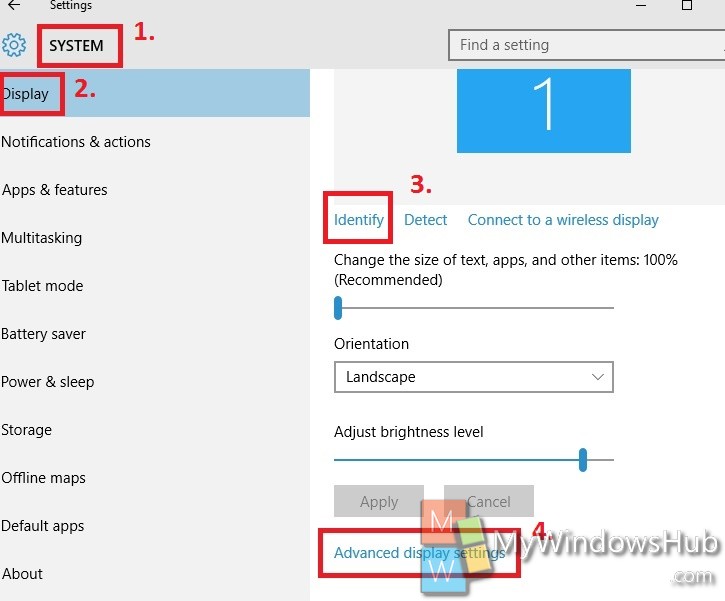
2. Go to System.
3. In the left panel, you will find Display panel. Tap on it. Make sure that Windows 10 is detecting all connected displays.
4. Click on Identify menu located at the bottom of the detected displays.
5. Scroll down the option in the right panel. Go to Advanced Display Settings.

6. Now select the monitor whose resolution is to be changed. There is an identifier link that’ll enable you to identify the monitors.
7. Next, open the drop down menu and select the resolution of your requirement.
8. The computer will then ask you whether you want to revert or keep the change. Click on Keep. The resolution of that monitor will be changed but that of the other monitors will remain the same.

