

The following tutorial will help you to disable OneDrive Integration in Windows 10. Following the same process, you can turn it back on. Windows 10 has deeply integrated OneDrive with Windows 10 so that all the photos, videos, documents and files are uploaded and updated automatically without requiring to do anything manually. If your internet connection is limited and you don’t want to consume data for the time being, you can disable the integration by enabling Prevent the usage of OneDrive for file storage from local Group policy editor.
-> Users can’t access OneDrive from the OneDrive app and file picker.
-> Windows Store apps can’t access OneDrive using the WinRT API.
-> OneDrive doesn’t appear in the navigation pane in File Explorer.
-> OneDrive files aren’t kept in sync with the cloud.
-> Users can’t automatically upload photos and videos from the camera roll folder.
Steps to Enable or Disable OneDrive Integration in Windows 10
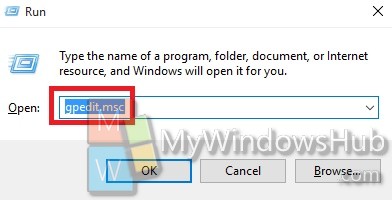
1. Press Win+R, type gpedit.msc and hit Enter to open the Local Group Policy Editor.
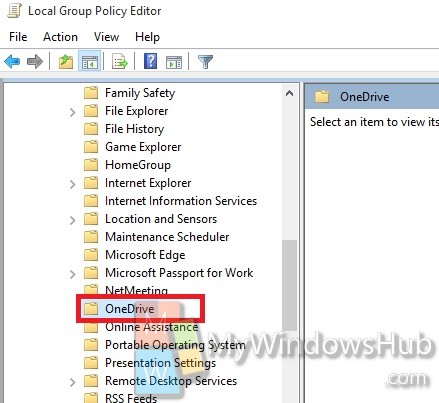
2. Navigate to the following location Computer Configuration-> Administrative Templates-> Windows Components-> OneDrive.
3. In the right pane, check out for Prevent the usage of OneDrive for file storage . Double tap on it to edit the policy. If you want to enable OneDrive integration, then either keep it Not Configured or mark it Disable.
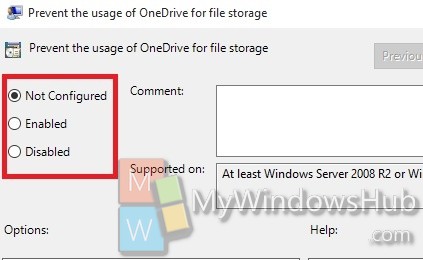
4. If you want to disable OneDrive integration, tap the Enable button.
5. Close the Local Group Policy Editor.
About Nick
Nick is a Software Engineer. He has interest in gadgets and technical stuffs. If you are facing any problem with your Windows, feel free to ask him.