A guest account is intended for users who do not possess a permanent account on your PC or domain. It permits the guest or individual to utilize your PC without even gaining access to your own personal data. Users who all are logged into the guest account can’t install softwares or hardware, alter PC preferences, or make a password.
Since the guest account really permits a user to sign in to a network, access the Internet, and shut down the PC, you should switch off the guest account when it is not being utilized.
Steps to turn On or Off Guest Account in User Accounts
1. Click on Start and open the Control Panel, and click on the User Accounts icon.
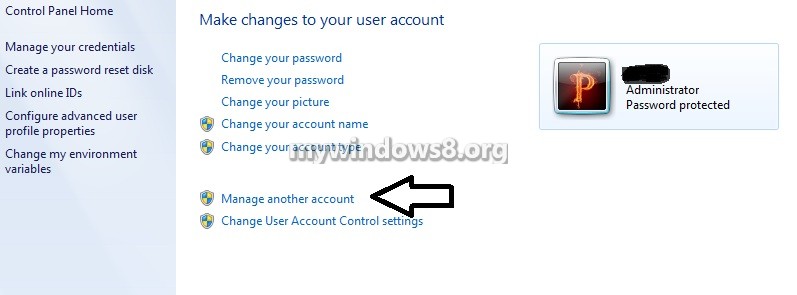
2. Click on the Manage another account link.

3. If asked by User Access Control settings, then click on Yes.
4. Click on the listed Guest account, and do step 5 or 6 below for what you would like to do.

5. To Turn On the Guest Account, just click on the Turn On button.

6. To Turn Off the Guest Account, just click on the Turn off the guest account link.

7. When completed with the above mentioned step, close the User Accounts window.
Turn On or Off Guest Account in Command Prompt
1. Open the command prompt in the administrative mode from the Start menu.
2. To switch on the guest account,in the opened command prompt just paste the command as given below, press Enter.
net user Guest /active:yes

3. To switch Off the Guest Account,in the opened command prompt just paste the command as given below, press Enter.
net user Guest /active:no

4. You can close the command prompt if you want to.
Turn On or Off Guest Account in Local Users and Groups
1. Open Local Users and Groups.
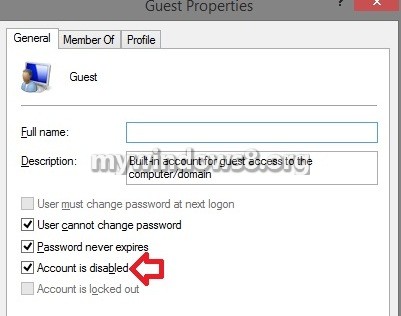
2. Click on Users in the left pane, and double click on Guest in the middle pane.

3. To Turn On the Guest Account,just uncheck the Account is disabled box, click on OK

4. To Turn Off the Guest Account,just check the Account is disabled box, and click on OK to enable the settings.
5. You can now close Local Users and Groups window if you want to.

