

In previous versions of Windows, like Windows 7, Vista, etc, installing and running SSH was not an easy task. The situation was somehow same for the Windows 10 Creators Update. But the Fall Creators Update has improved the system and eased the process of running SSH. Here is a short guide to install OpenSSH in Windows 10.
As per the company, OpenSSH is the premier connectivity tool for remote login with the SSH protocol. It encrypts all traffic to eliminate eavesdropping, connection hijacking, and other attacks. In addition, OpenSSH provides a large suite of secure tunneling capabilities, several authentication methods, and sophisticated configuration options.
The OpenSSH suite consists of the following tools:
- Remote operations are done using ssh, scp, and sftp.
- Key management with ssh-add, ssh-keysign, ssh-keyscan, and ssh-keygen.
- The service side consists of sshd, sftp-server, and ssh-agent.
Steps To Install OpenSSH in Windows 10
1. First tap on the Start menu and go to Settings.
2. Now click on Apps settings.
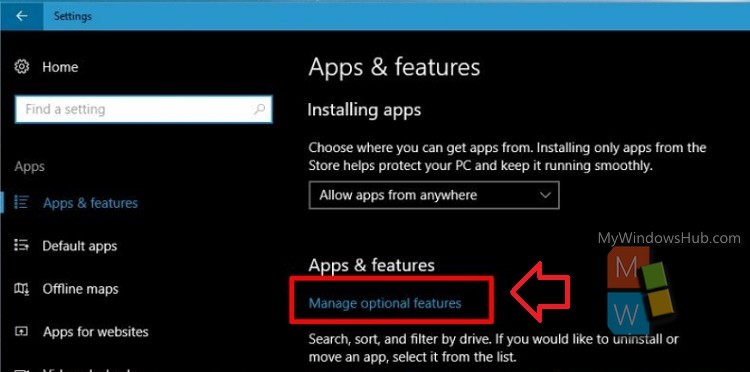
3. Go to Apps & features menu. Next, click on ‘Manage optional features’.
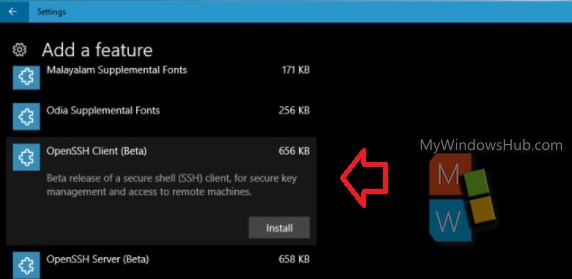
4. Under the Manage Optional Features menu, you can find various types of packs including language packs. Since, you have to install another application package, click on Add a Feature button.

5. Now find out the OpenSSH Client or Server feature. Once you find it out, click on it and hit the Install button. The installation will take some time. You can install both the client and thfeature, butature but it depends on your requirement. As of now, the features are in Beta. So, it is possible that there may be bugs in it. However, the process of installation of the server and the client is same.
6. That’s all about installing OpenSSH.