

The following tutorial will help you to show or hide the Sleep option in Power Options menu in Windows 10. If you open the Star menu, right click on the Power menu, you will find three options: Restart, Shut Down and Sleep. If you want, you can customize these options-like disabling the Sleep option from Power Options. The process is very simple. It can be done either by changing the settings from Control panel or from Local Group Policy Editor. There is a policy setting called “Show sleep in power options”.
If you enable this policy setting, the sleep option will be shown in the Power Options menu (as long as it is supported by the machine’s hardware). If you disable this policy setting, the sleep option will never be shown in the Power Options menu. If you do not configure this policy setting, users will be able to choose whether they want sleep to show through the Power Options Control Panel.
Steps to Enable/Disable Sleep option in the Power Options Menu in Windows 10
1. Press Win+R to open Run Window. Type gpedit.msc to open Local Group Policy Editor.

2. In the left panel, navigate to the following location
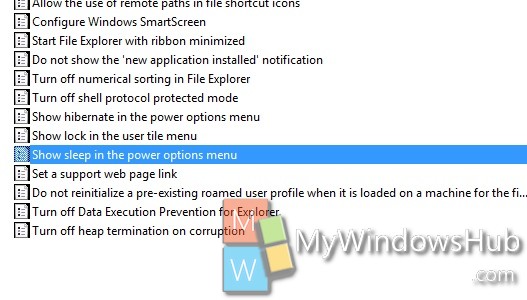
Computer Configuration/Administrative Templates/Windows Components/File Explorer

3. In the right pane, you will find a policy as Show Sleep in the Power options Menu. Double tap on it to edit it. By default , it is not configured. You have to edit it and set your required policy.
4. If you want to enable the sleep option in Power options, double tap on the policy. Double tap on the policy and check Enabled.
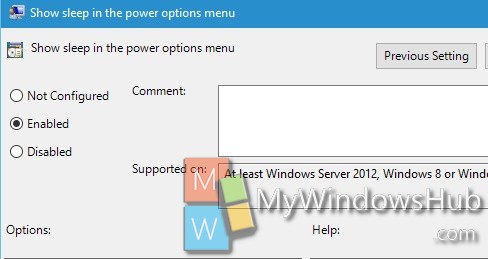
5. If you want to disable sleep in Power options, select Disabled or Not Configured.
6. Close Local Group Policy Editor.
About Nick
Nick is a Software Engineer. He has interest in gadgets and technical stuffs. If you are facing any problem with your Windows, feel free to ask him.
Hi Nick,
Thanks for the invite to ask you for help.
I bought a PC with Win 10 Home installed. When I got it the Sleep option was available in the menu you get when pressing Win-X, U. That indicates the hardware supports it.
I had a system crash and had to reinstall windows. The Sleep option was no longer available. I upgraded to Win 10 Pro. I followed your instructions to enable Sleep using the Local Group Policy Editor. I restarted the PC but Sleep was not available. I checked to see if Local Group Policy Editor was still showing it enabled. It is.
I have tried enabling Sleep using Control panelAll control Panel ItemsPower OptionSystem Settings. The Power and sleep button settings do not give me the Sleep option.
I tried Change setting that are currently unavailable. Nothing there either.
I have administrator privileges with my default login.
David