

With an increase in the spread of vulnerable programs such as viruses and malwares, Microsoft has increased windows security with it’s all-new Microsoft Defender Antivirus. From Windows 10 version 2004, Windows Defender has been renamed to Microsoft Defender Antivirus, which is enabled by default and actively protects you from all the latest security threats. The updates are automatically downloaded, and Microsoft continually updates the virus definition to keep your device safe.
Microsoft defines the Defender Antivirus as the next-generation protection component Microsoft Defender Advanced Threat Protection(MDATP) provides below features,
- Real-time antivirus protection
- Built-in cloud protection while surfing the web, downloading email attachments or accessing OneDrive
- Block at first sight (BAFS) protection
Without real-time protection, your operating system would be unsafe and hostile to work on as malicious programs spread quickly over email, USB flash drives, or browsing the internet. Malwares can affect your system without your knowledge and can steal potential information or even damage your disk drives.
You can turn off the Windows Defender Antivirus temporarily. Windows automatically turn on the real-time protection if it’s disabled for a while. In this advanced Windows 10 tutorial, we will walk you through the steps to turn on or off the Windows Defender Antivirus permanently for all the users.
Note:
- Systems with multiple users, make sure you are signed in as an administrator to enable or disable the antivirus.
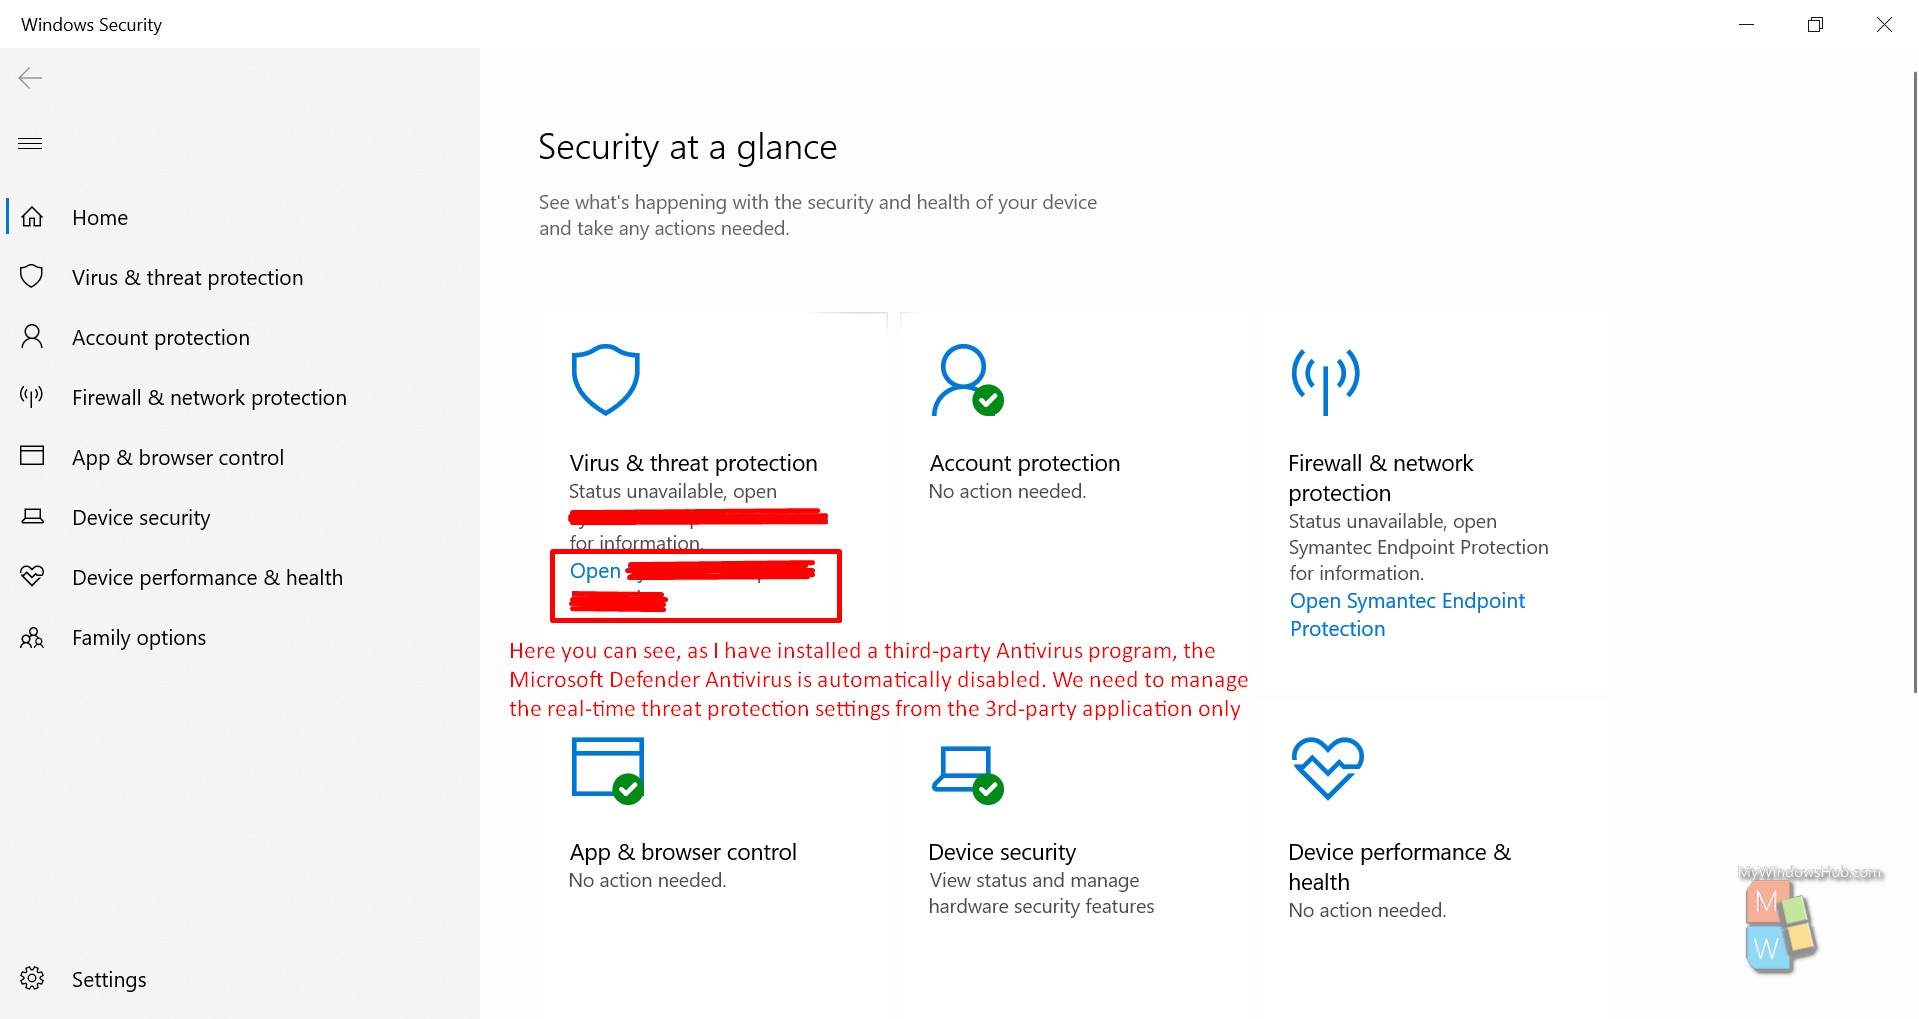
- If you are installing any third-party Antivirus programs, then they disable the Microsoft Defender Antivirus. In this case, you cannot enable it till you uninstall the third-party antivirus program.
- With Windows 10 build 18305 or higher version, you need to disable Tamper protection to disable Microsoft Defender Antivirus.
Option #1: Enable/Disable Microsoft Defender Antivirus using group policy
The Local Group Policy Editor is available only in the below versions of Windows 10,
- Windows 10 Pro
- Windows 10 Enterprise
- Windows 10 Education
For the other versions of Windows, you need to follow the option #2 explained after this.
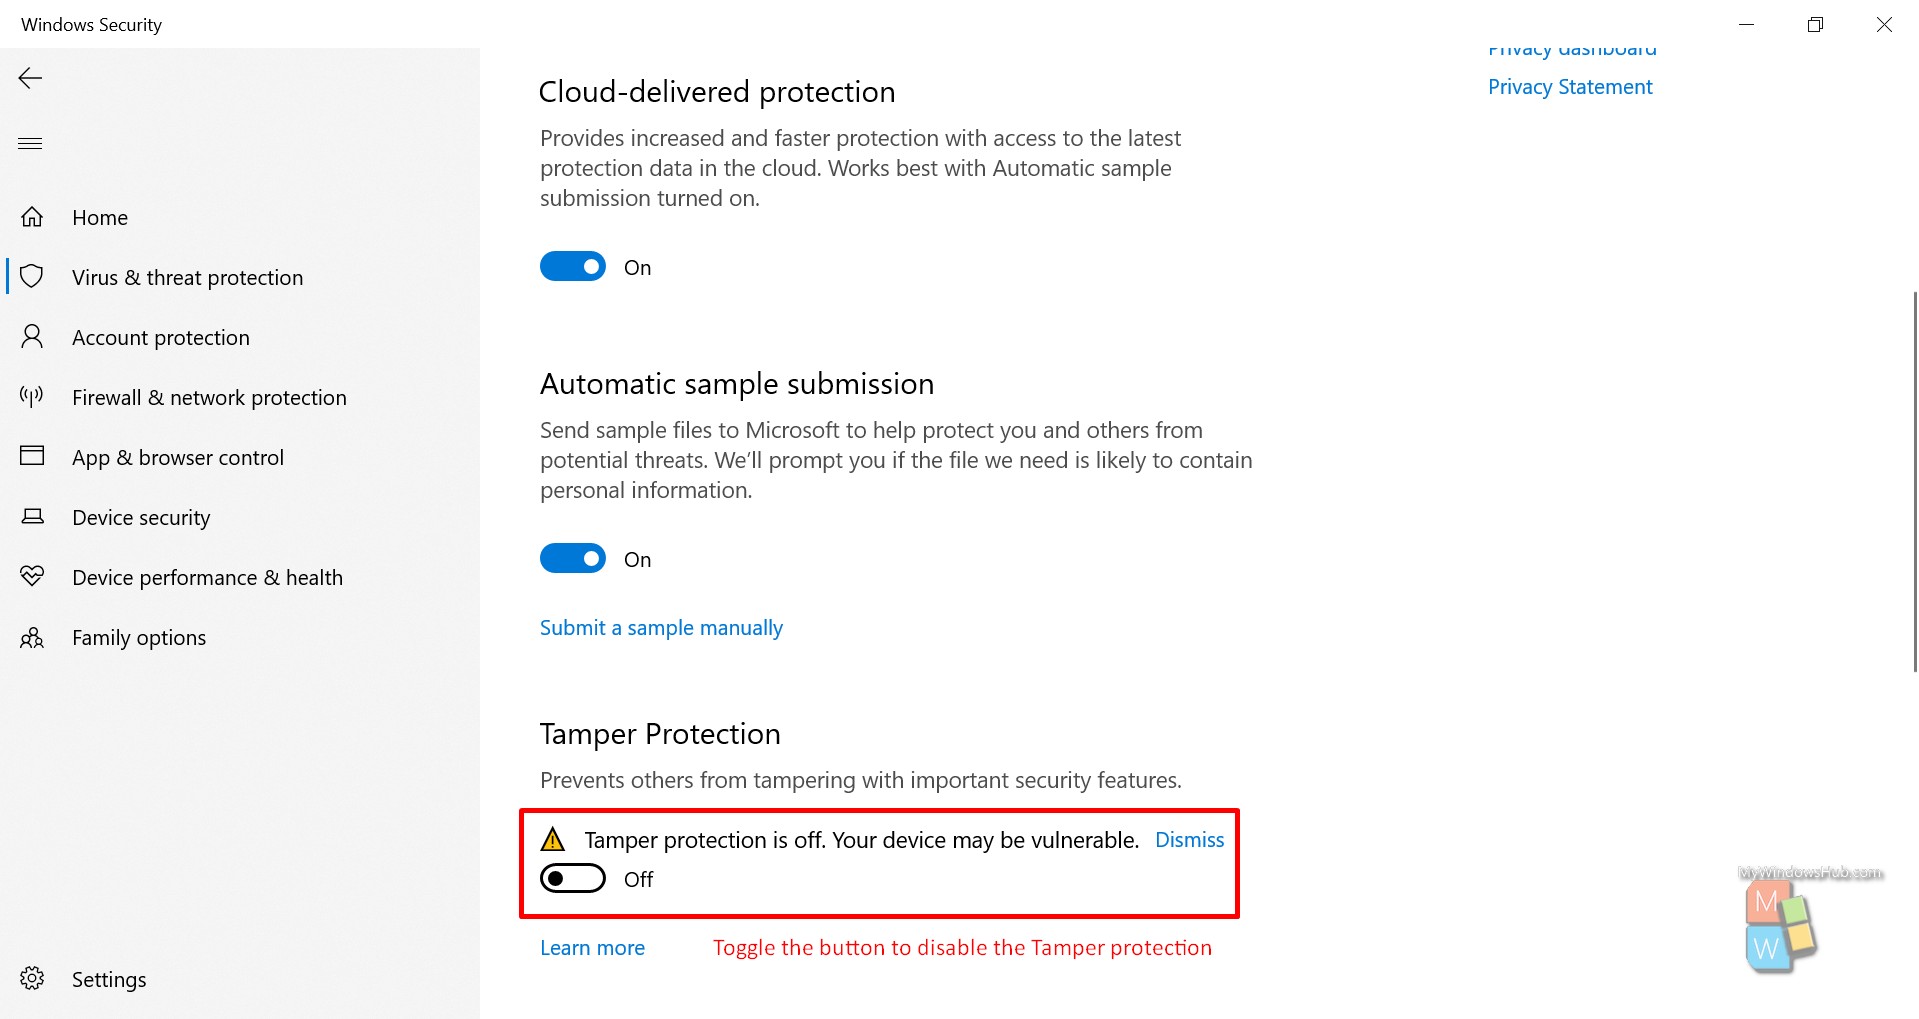
Steps #1 Disable Tamper Protection:
You need to turn off the Windows Defender Antivirus Tamper protection based on your build number by following the below steps,
- Go to the Windows security page.
- Click the “Virus & Threat Protection” option present at the left-hand side navigation bar.
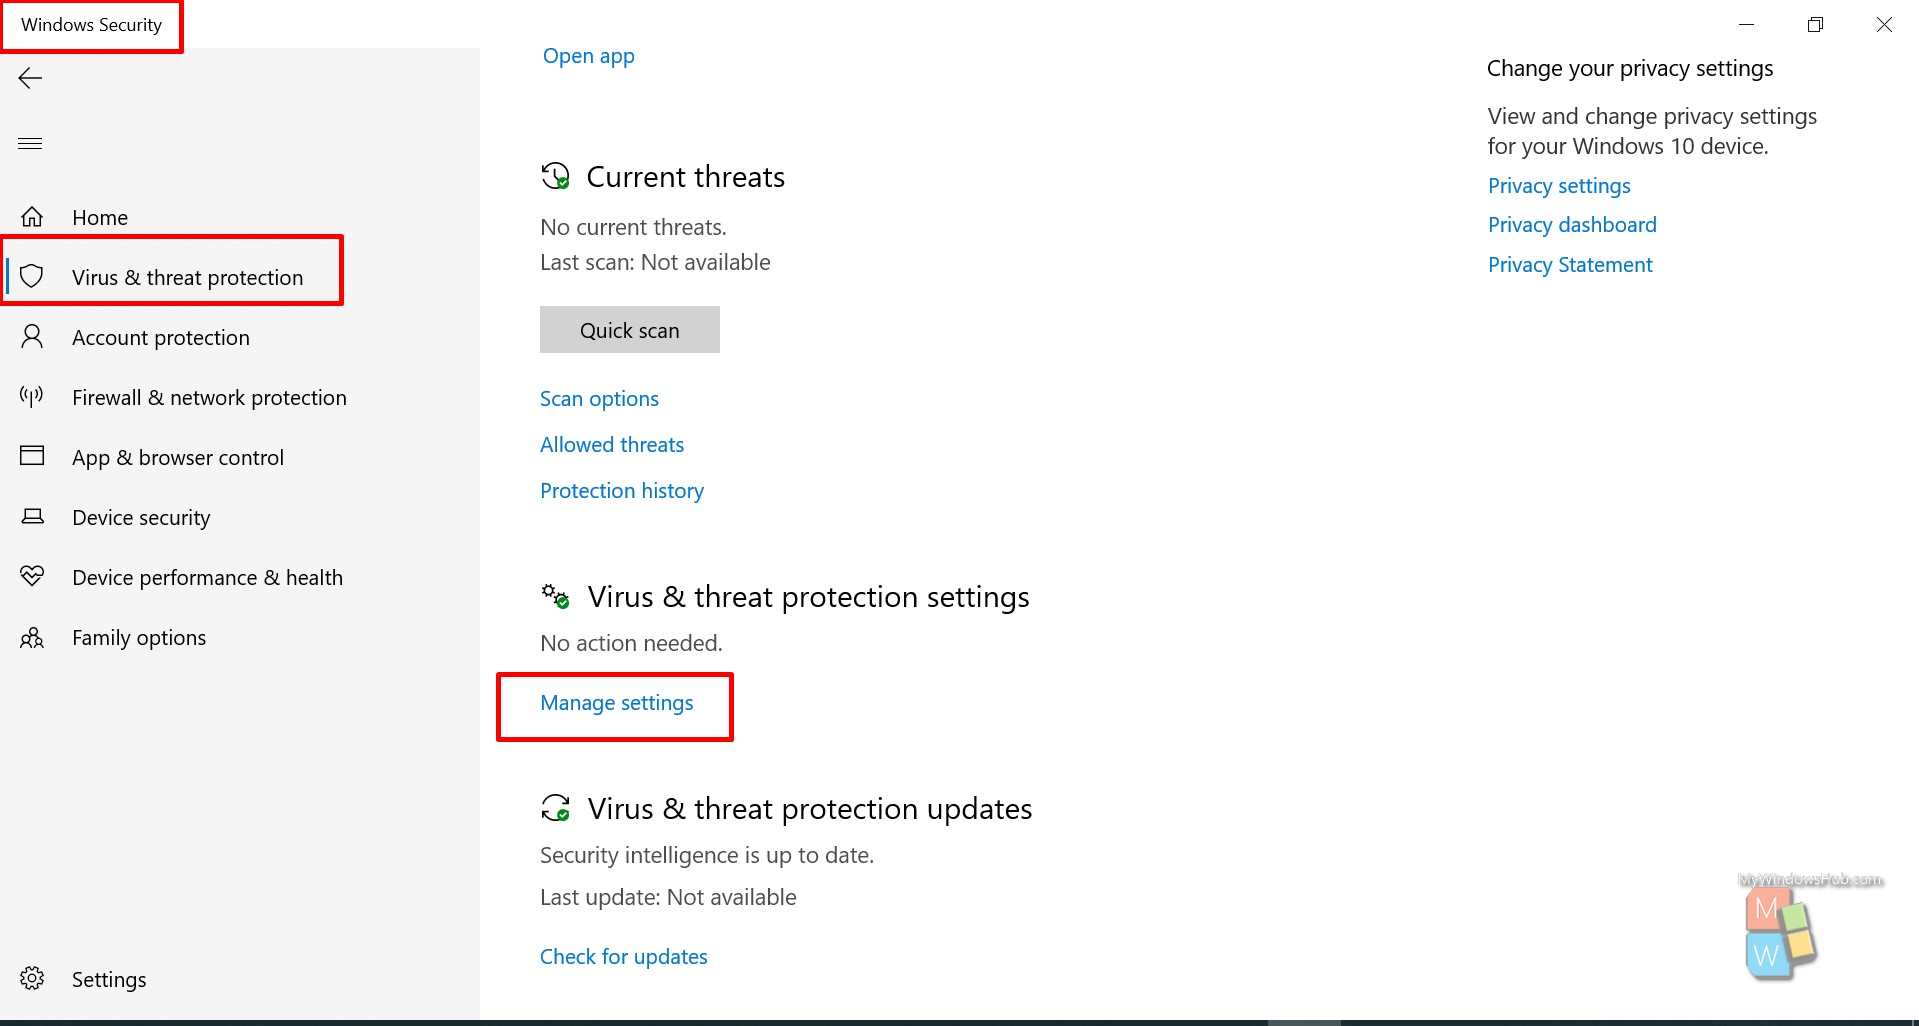
- Scroll down the page and click the “Manage settings” link.
- Scroll down and toggle the button for “Tamper Protection” as mentioned in the below screenshot.
- If UAC prompts you, click Yes to approve.
You can turn on or off the Tamper protection from the registry editor as well,
- Location: HKEY_LOCAL_MACHINE\SOFTWARE\Microsoft\Windows Defender\Features
- Variable name: TamperProtection DWORD
- Values : 0 = Off, 5 = On

Step #2 Open the Local Group Policy Editor:
- Open Run dialog by pressing Win + R on your keyboard.
- Type “gpedit.msc” and hit enter to open the local group policy editor.
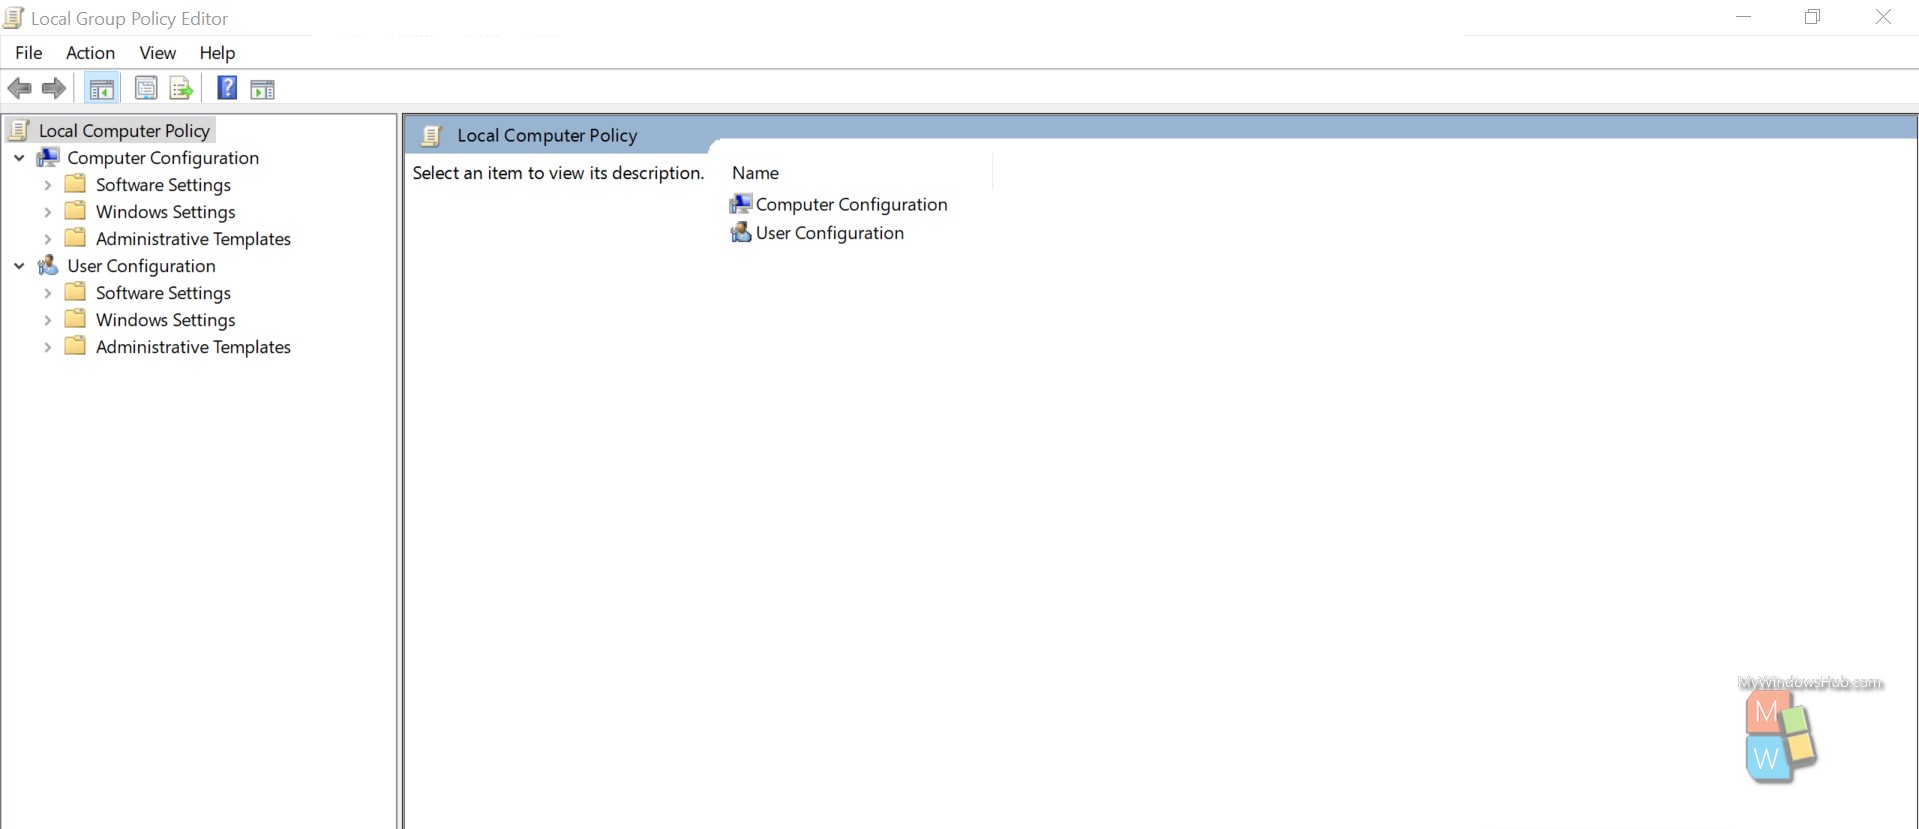
Step #3 :
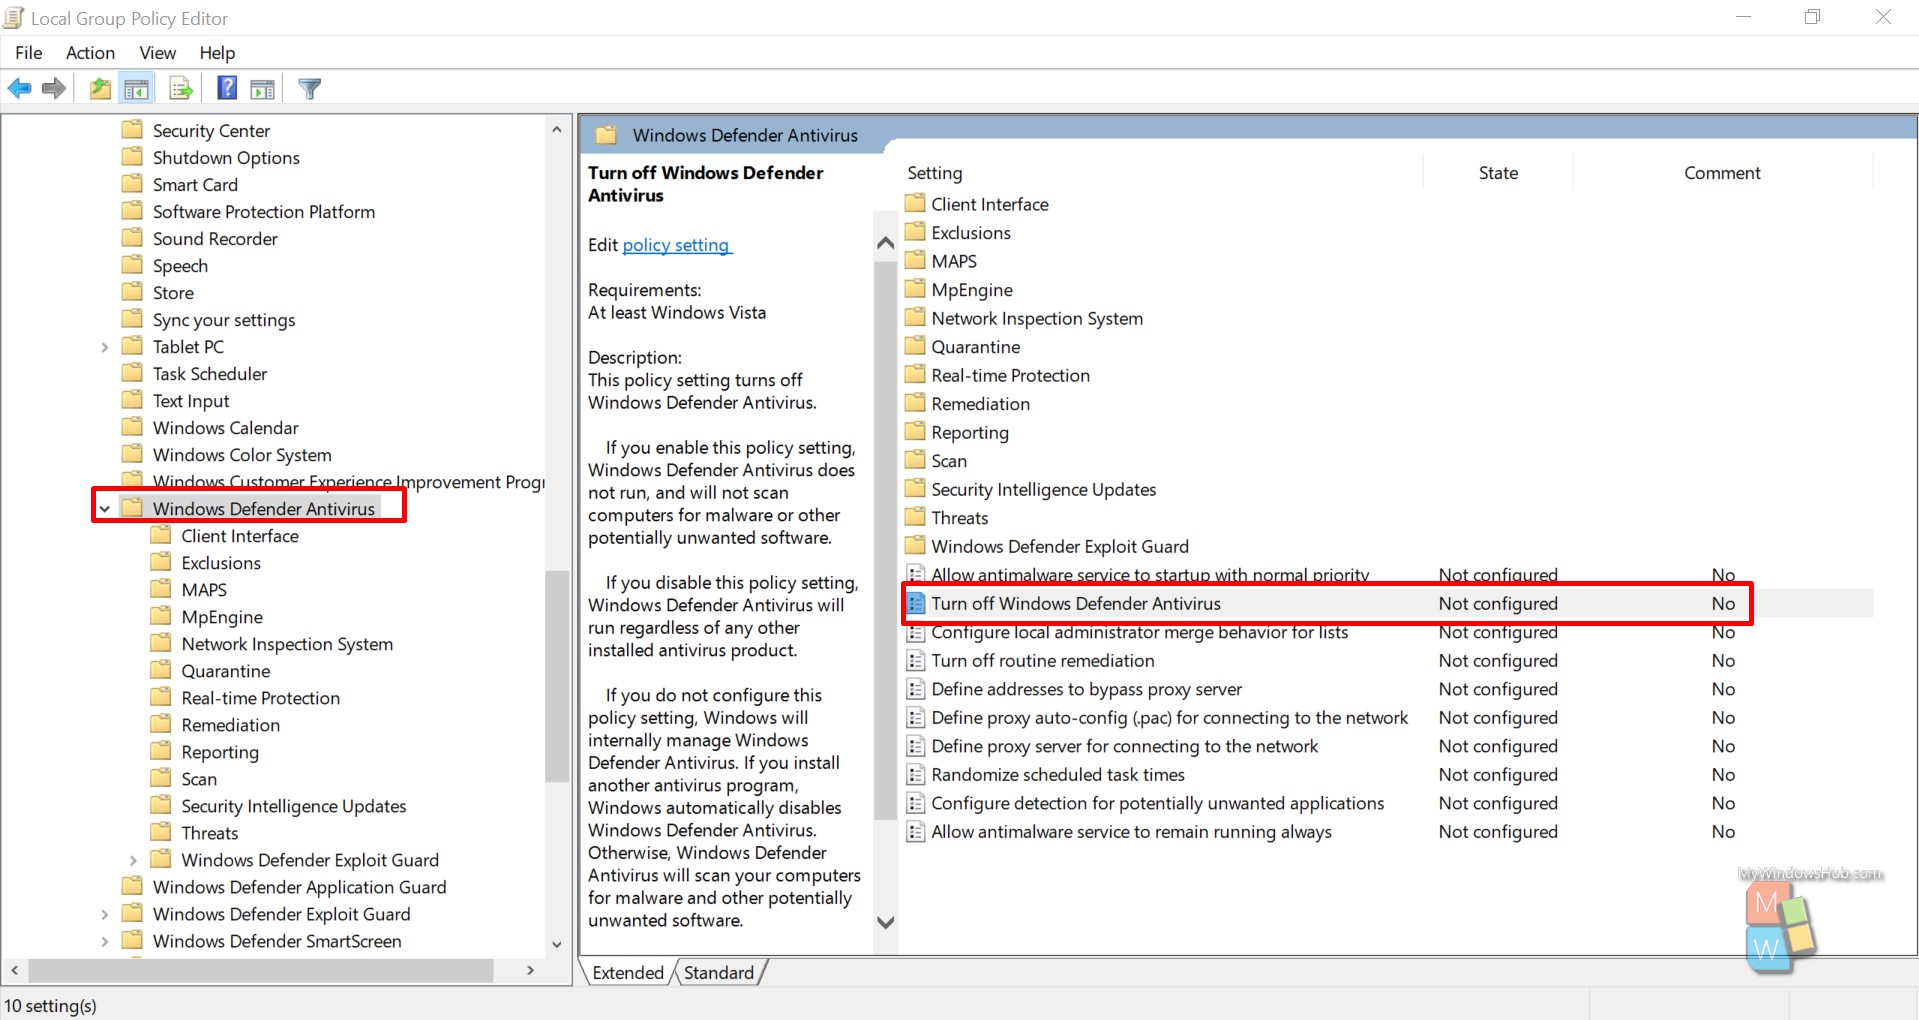
Navigate to the below mentioned location based on your Winodws 10 version on local group policy editor,
- Windows 10 version 1909 and lower: Computer Configuration\Administrative Templates\Windows Components\Windows Defender Antivirus
- Windows 10 version 2004 and higher: Computer Configuration\Administrative Templates\Windows Components\Microsoft Defender Antivirus
Step #4:
- In the right-hand panel of Windows Defender Antivirus or Microsoft Defender Antivirus in Local group policy editor, double click on “Turn off Windows Defender Antivirus” or “Turn off Microsoft Defender Antivirus” policy to edit it.
- You can either enable or disabled the Windows Defender Antivirus by clicking the required checkbox(either Enabled or Disabled) as mentioned below,
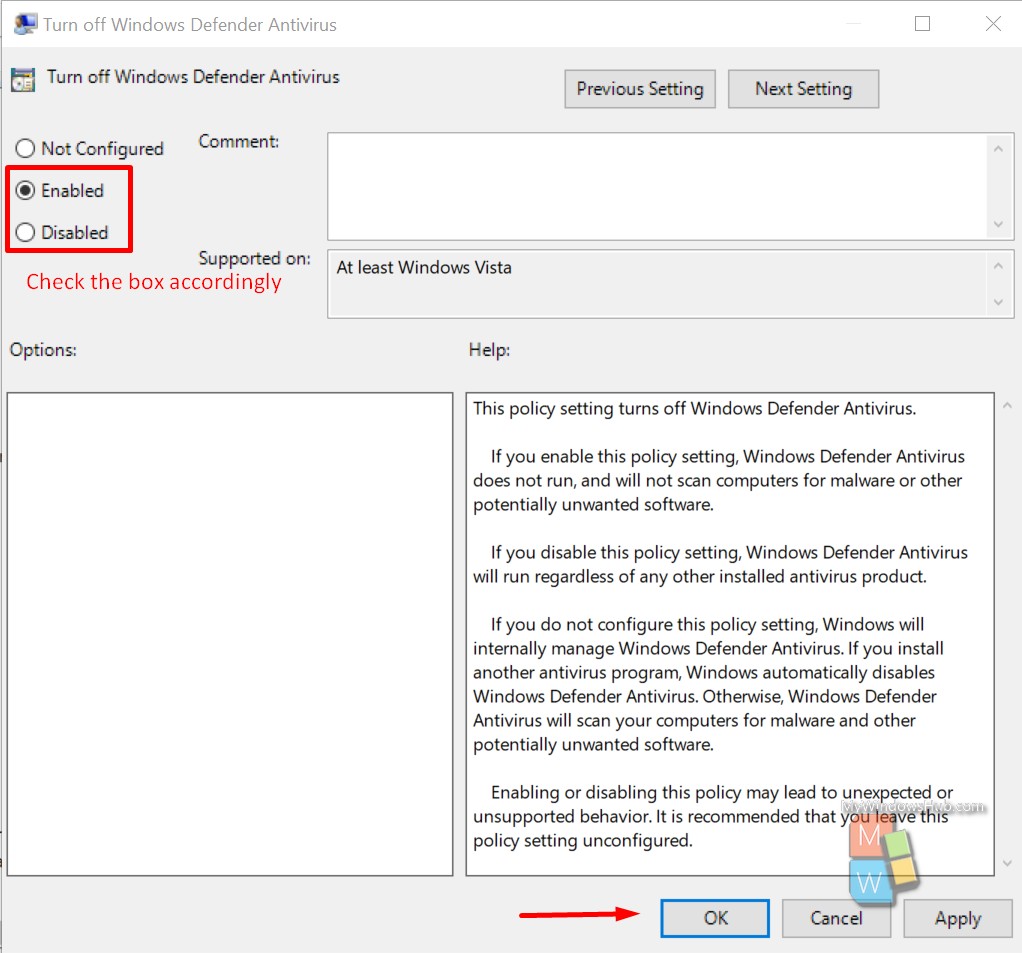
- Click on the “Ok” button to save the changes.
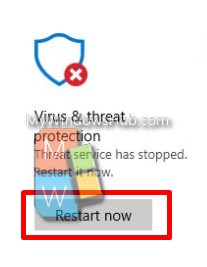
Step #5:
Based on your previous selection, you need to revisit the Windows security page, and you will be prompted to either restart or turn on the service.
Option #2: Turn on or off Microsoft Defender Antivirus from Registry editor
The second option involves changing the property values directly from the registry editor for Windows Defender. This option is handy for all Windows versions for which the Local Group Policy Editor is not available. You can follow the steps or download the below mentioned executable reg files.
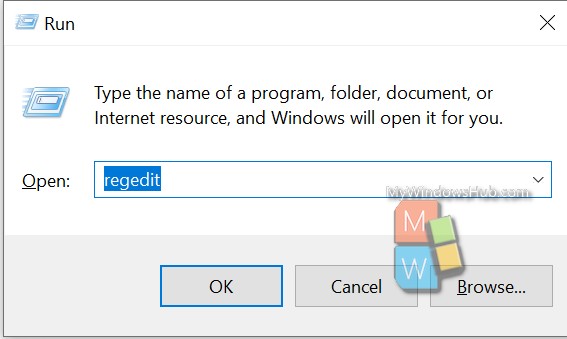
Step #1:
- Open Run dialog by pressing Win + R on your keyboard.
- Type “regedit” and hit enter to open the Registry Editor window.
Step #2:
Navigate to the below mentioned location on your Registry editor as mentioned below,
- Location: HKEY_LOCAL_MACHINE\SOFTWARE\Policies\Microsoft\Windows Defender
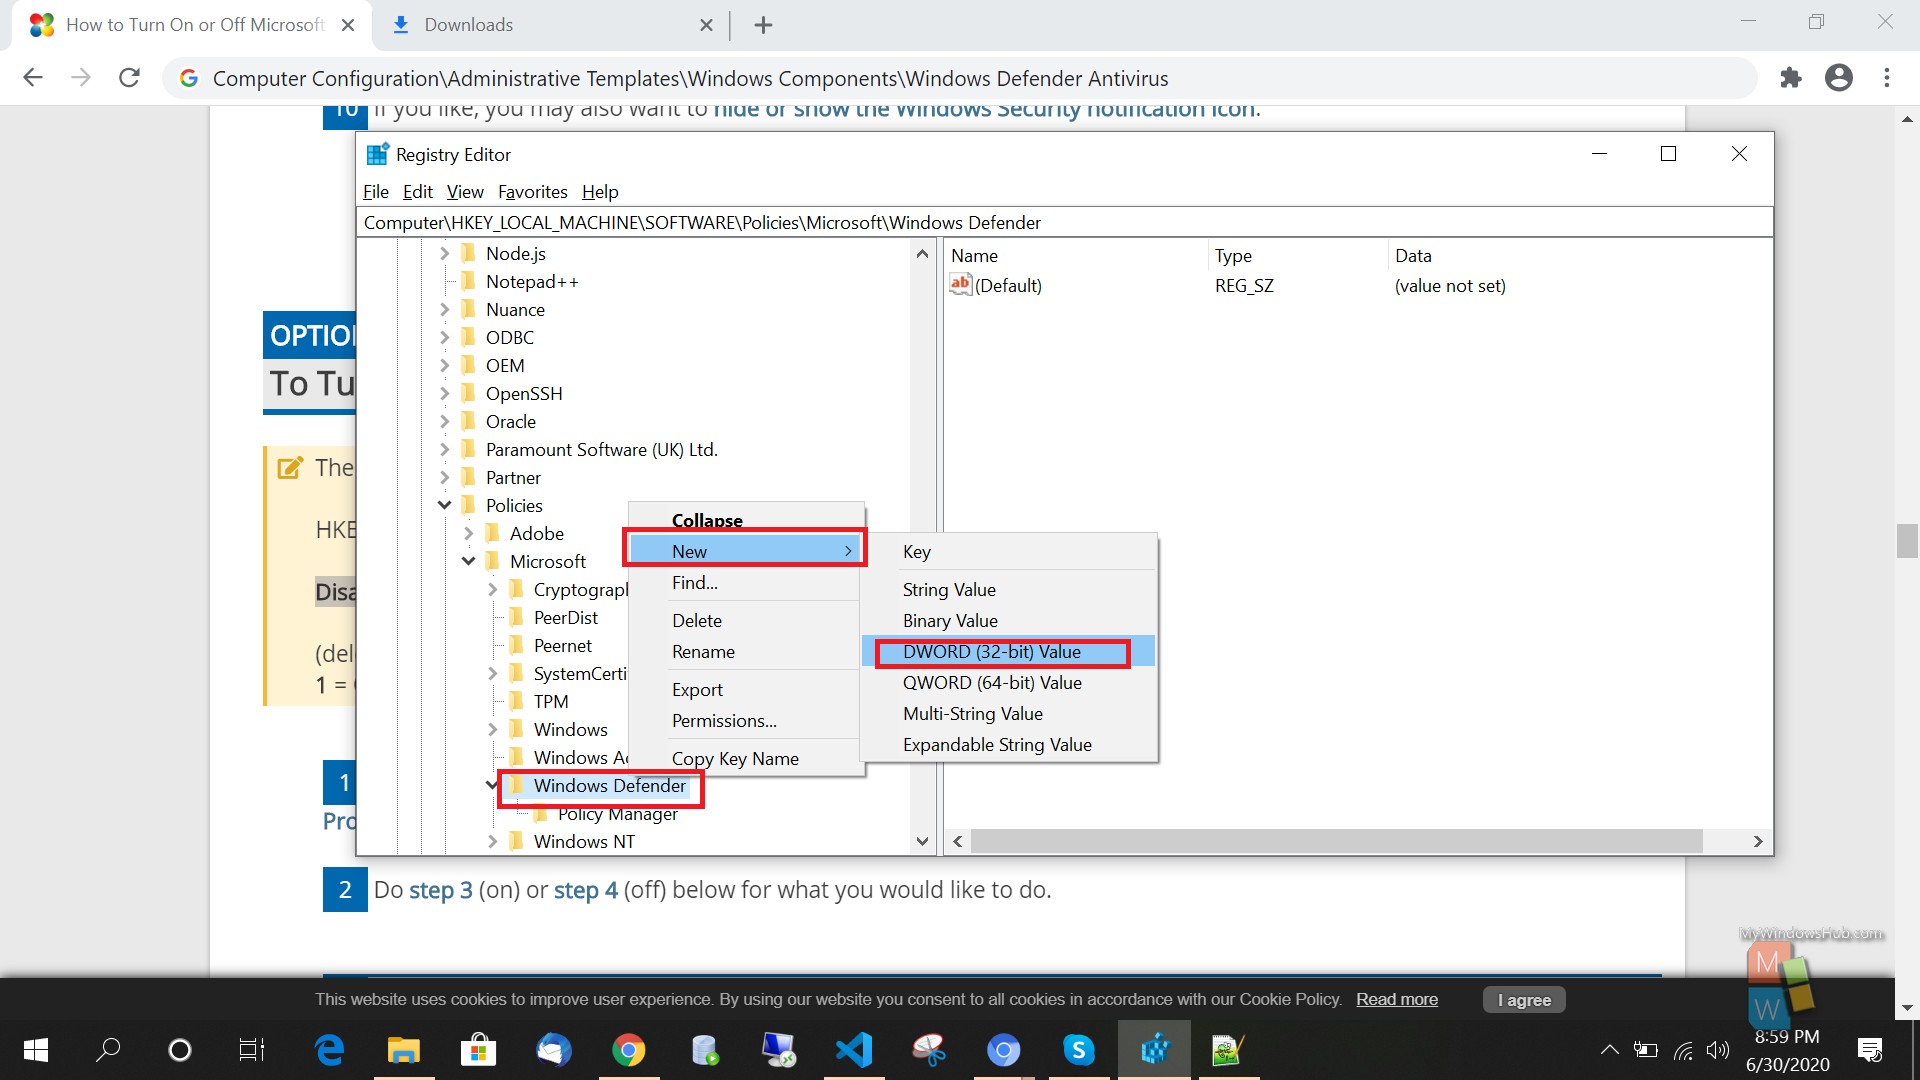
- Add a new variable DisableAntiSpyware DWORD.
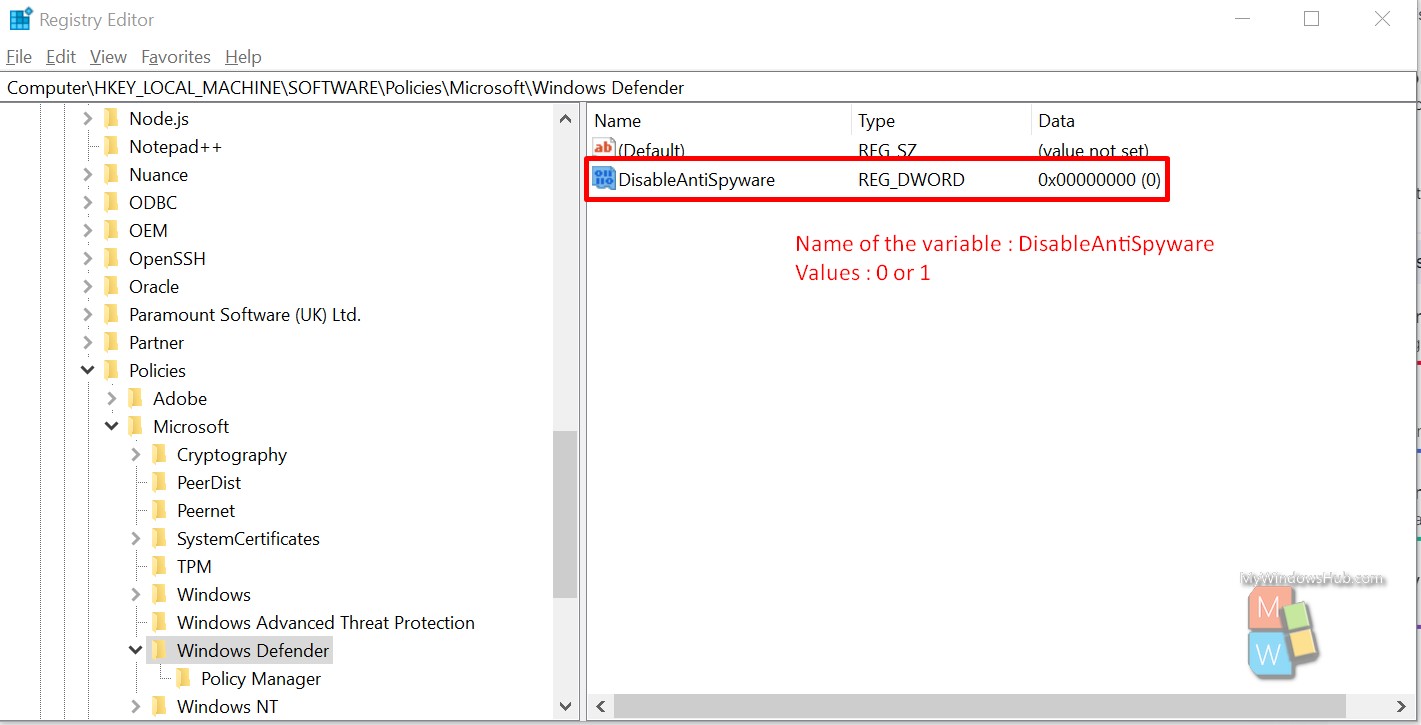
- Double-click on the variable name “DisableAntiSpyware” and the below dialog will ask you to enter a value,
- Values: (delete) or 0 = On and 1 = Off
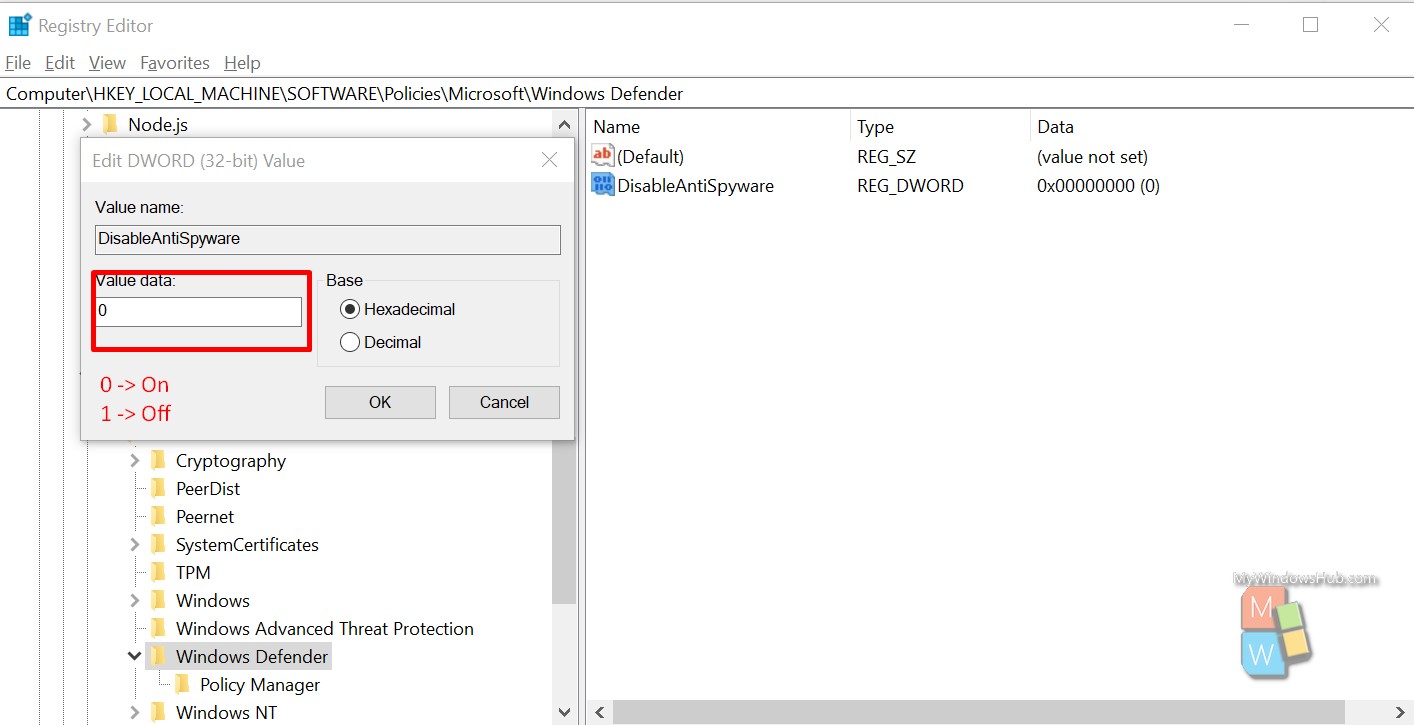
- You can open the Windows Security from settings to verify the spyware’s status and, if needed, you can restart or turn on the service.
Conclusion:
In this advanced Windows 10 tutorial, we have walked you through different ways to enable and disable Microsoft Defender Antivirus. The first option was restricted to fewer selected versions of windows; hence we have explained the second option to do the same for the rest of the windows versions. Again, this is not recommended to disable Microsoft Defender Antivirus, but sometimes we need to perform it for various reasons such as improving the performance or playing around different tweaks.
About Harsit Mohapatra
Harsit Mohapatra is a full-time Software Engineer passionate and hungry for tech updates and knowledge. Besides being a crazy software developer, he is an avid traveller and loves capturing the things that give him a perception through his lenses