

The Advanced Host Controller Interface (AHCI) is a technical standard that defines the operation of Serial ATA (SATA) host adapters in non-implementation specific manner.
The specification describes a system memory structure for computer hardware vendors to exchange data between host system memory and attached storage devices. AHCI gives software developers and hardware designers a standard method for detecting, configuring, and programming SATA/AHCI adapters. AHCI is separate from the SATA 3 Gbit/s standard, although it exposes SATA’s advanced capabilities (such as hot swapping and native command queuing) such that host systems can utilize them.
Nowadays most of the motherboards have AHCI enabled in UEFI or BIOSby default. If you have installed your operating system with IDE but want to install it with AHCI, then you have to enable AHCI in your computer.
This tutorial will show you how to enable AHCI in Windows 10 if you have installed the operting system with IDE by mistake.
Steps to Enable AHCI in Windows 10 after Installation
1. Press Win+R to open the Run window. Type regedit and hit Enter to open the Registry Editor.

2. As the Registry Editor opens, go to the following location HKEY_LOCAL_MACHINE\SYSTEM\CurrentControlSet\Services\iaStorV
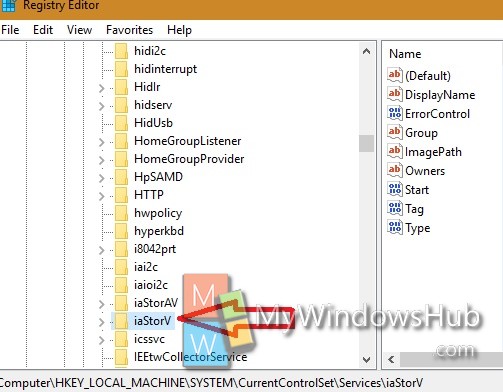
3. Select iaStorV. In the right panel, double click on the Start DWORD to modify its value.
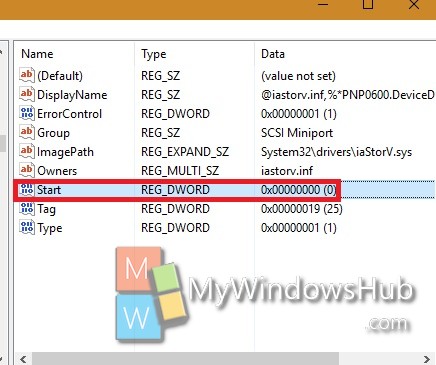
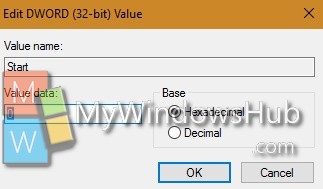
4. Set the value to 0 for AHCI.
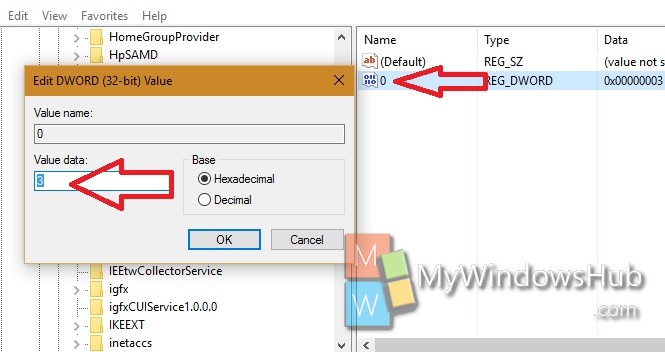
5. Now again browser to the following location HKEY_LOCAL_MACHINE\SYSTEM\CurrentControlSet\Services\iaStorAV\StartOverride.
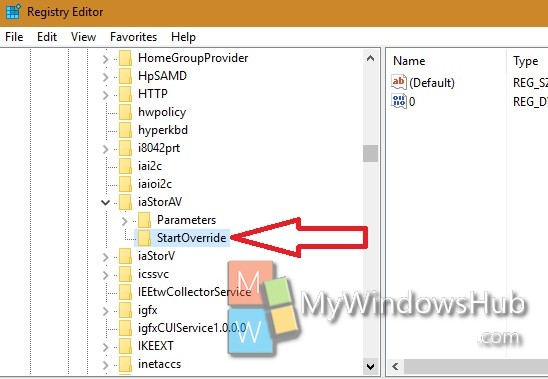
6. Select StartOverride, and then in the right pane, double tap on the 0 DWORD to modify its value.
7. Set the value to 0. Click OK.
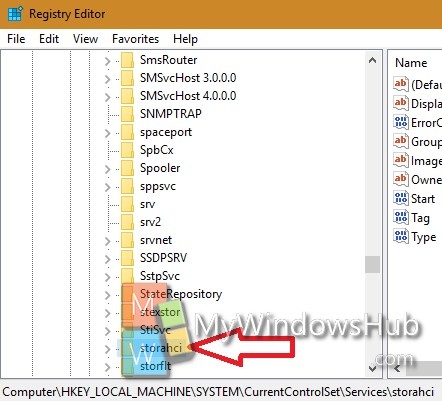
8. Now again navigate to the following location HKEY_LOCAL_MACHINE\SYSTEM\CurrentControlSet\Services\storahci
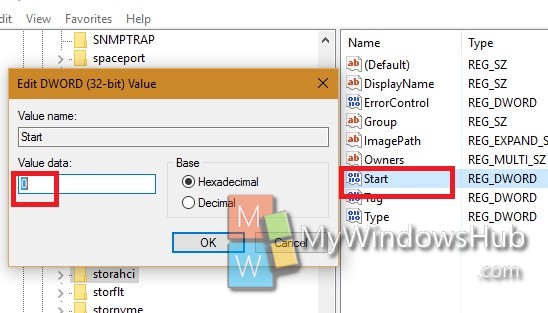
9. In the right panel, double tap on the Start DWORD to modify its value.
10. Set the value to 0.
11. Again go to the following location HKEY_LOCAL_MACHINE\SYSTEM\CurrentControlSet\Services\storahci\StartOverride.
12. if you do not find the StartOverride, then close the Registry Editor, else continue to step 13.
13. In the right pane of StartOverride, double click on 0 keyword and set the value to 0.
14. Close the Registry Editor.
15. Boot the computer to your BIOS or UEFI firmware settings.
16. In your BIOS or UEFI firmware settings, enable AHCI, and save & exit to apply the changes. Restart the computer.
About Nick
Nick is a Software Engineer. He has interest in gadgets and technical stuffs. If you are facing any problem with your Windows, feel free to ask him.
Thanks Nick. Purchased an ssd, sure didn’t see any upgrade. After your clear and concise directions, I sure do now. Many thanks!