This tutorial will show you how to Disable Data Execution Prevention in Windows 8 and Windows 8.1
What is Data Execution Prevention?
DEP- Data Execution Prevention is a security feature and is included in most of the modern operating systems.
It is available in Microsoft Windows, Linux, Mac OS X, iOS and Android operating systems. It is implemented to prevent an application or service from executing code from a
non-executable memory region.
Data Execution Prevention (DEP) was started first with Windows XP and Windows 2003 Server, its main purpose was to provide system-level memory protection feature.

DEP empowers the system to mark one or more pages of memory as non-executable, i.e. the code cannot be run from that region of the memory. Code cannot be even accessed from default heaps, stacks, and memory pools. If any application tries to access the code from the protected section, an exception occurs and hence the process is terminated if the exception is not handled.
DEP runs in two modes :-
- Hardware-Enforced DEP for CPUs that can mark memory pages as nonexecutable
- Software-Enforced DEP for CPUs that do not have hardware support
There are two methods to enable or disable data execution prevention in windows 8
First Method
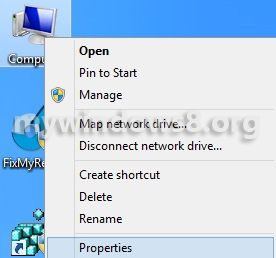
1. Right-click on Computer icon on the desktop and click Properties.
2. Click on Advanced System Settings.

3. Now, click on the settings button under the Performance label.

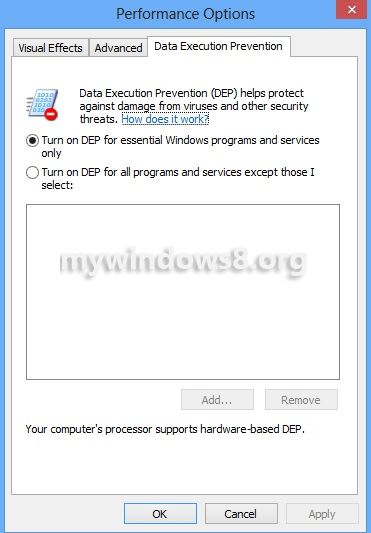
4. In the Performance Options window select the Data Execution Prevention tag. Enable/Disable the DEP and click OK.
Second Method
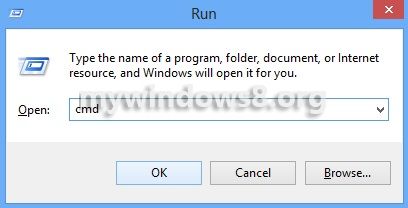
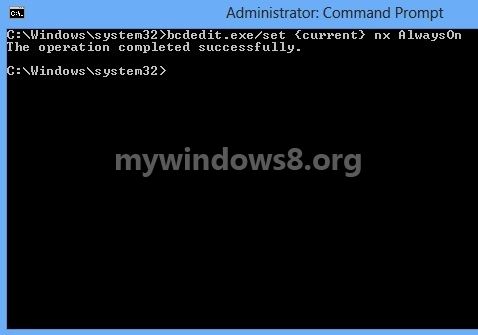
1. Open the Run Window by pressing Window + R buttons, type cmd and press Enter.
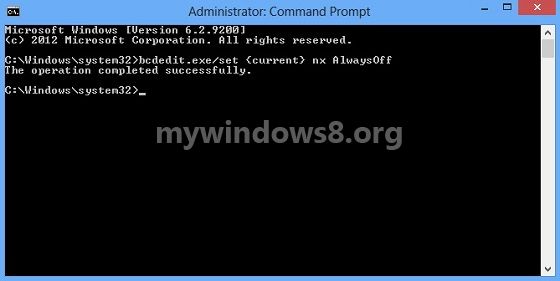
2. Disable DEP – Type bcdedit.exe/set{current} nx AlwaysOff
Hit Enter.
3. Enable DEP – Type bcdedit.exe/set{current} nx AlwaysOn
Hit Enter.
Check this link, if you are facing The value is protected by secure boot policy and cannot be modified or deleted error.


Than you very very very very very much, i searched thid the hole time 🙂
Hi, William thanks for commenting.
my cmd reports : The boot configuration data store could not be opened. Access is denied.
p.s I am onley computer user
Hi edin please open Run with “Administrator Privileges”, instead of opening it by pressing Windows + R keys.
Then follow other steps.
It will solve your problem.
Read here “How to open Administrative Command Prompt” :
http://mywindows8.org/open-administrative-command-prompt-in-windows-8/
Great work Nick as always… however, I did open Run with “Administrator Privileges” but am still getting the same as edin… The boot configuration data store could not be opened. Access is denied.
HELP 🙂
Scratch that Nick…. it says “an error has occurred setting the element data. The value is protected by secure boot policy and cannot be modified or deleted.”
Hi Charlie, please follow the steps below :
Search for “Advanced System Settings” in “Settings Search”. Under Settings search you will get the option in left pane. Click on it then
Under Performance, click Settings.
Click the “Data Execution Prevention”{ tab, and then click “Turn on DEP for all programs and services except those I select”.
Cheers
Nick
Hii to me it does not work .. War not a error message and it says that I have misspelled or there exists
Use Admin Command prompt and please see the screenshots… make sure you are typing the command correctly. Don’t copy-paste it.. try to type manually.
Hi nick:
I tried two ways of exhibiting in this post. In the first, I get the following message:
“This program must run with data execution protection (DEP) enabled. Unable to disable DEP for this program.”
In the second, shows me this error:
“Failed to set data element. The value is protected by secure boot policy and can not be modified or deleted.”
The two procedures are run as Administrator.
PLEASE HELP! From already thank you very much.
Hi Fransisco,
Try to run these command :
bcdedit.exe /set nx AlwaysOff
Make sure you are using an Admin account and using Elevated Command Prompt.
Let me know the result.
I was getting the same “the value is protected by secure boot policy and cannot be modified or deleted” error, though I was running command prompt as admin.
So I had to disable the Secure Boot Policy from BIOS
Here are the steps I followed and it has worked:
1. Go to right bar (win+c)->Settings ->Change PC Settings (on the bottom)
on the next screen PC Settings
2. General->Advanced Start Up (at the far bottom)
next screen
3. Troubleshoot -> Advanced Options ->UEFI Firmware Settings->Restart
Once the computer restarted, it went to the BIOS
I have a LifeBook N Series laptop, so on the SECURITY Tab I could not change the settings for Security Boot Policy.
I had to set a SUPERVISOR password and then I was able to [DISABLE] the Security Boot Policy
Exit and Save Changes
when the computer restarted, went to command prompt (admin) (by pressing win+x you can find this option easily) and
the command that worked was:
bcdedit.exe /set nx AlwaysOff
(the command with the /set{current} was not recognized)
Hope that helps.
Hi pavlos thanx for sharing the complete steps. In my previous comment I have already mentioned to try the command:
bcdedit.exe /set nx AlwaysOff
Data Exceution Prevention settings greyed out ( Error : To use these settings, you must be a computer administrator and you must use the bcdedit.exe file) :
Screenshot : http://img452.imageshack.us/img452/7967/depproblemcx4cg1.jpg
if you face this issue than try :-
1. Run a CMD as Administrator.
2. enabling DEP:
bcdedit.exe /set {current} nx AlwaysOn
bcdedit.exe /set {current} nx optin
OR
disabling DEP:
bcdedit.exe /set {current} nx AlwaysOff
3. Restart PC.
Please note :
disabling DEP:
bcdedit.exe /set {current} nx AlwaysOff
bcdedit.exe /set {current} nx optin
Hey nick i tried to disable bcdedit but it does not work!
Screen:
http://gyazo.com/86d937de32185e7bb03da3043ebf7d9c
I try to put my program to not be used by DEP but it says this
Screen:
http://gyazo.com/758e098d21af34075bae80eea7c76ce7
Hi,
Please follow the steps mentioned here: http://mywindows8.org/solved-the-value-is-protected-by-secure-boot-policy-and-cannot-be-modified-or-deleted/
Cheers
but when i try to turn off the bcdedit in cmd at administrator mode it shows”An error has occurred setting the element data.
The value is protected by Secure Boot policy and cannot be modified or deleted.”. so now what should I do to turn it off.
Hi lalith, please just see my above comment. The solution is already mentioned there.
Hi nick can you fix this problem to use these settings you must be a computer administrator and must be used bcdedit.exe