Touchpad is an inseparable and significant part of laptops. Touchpads have modified with time and with implementations of advanced and new technologies and have now become an integral part. However, if you connect a mouse with your laptop, you might not prefer to use the touchpad. In that case, you can turn off the touchpad. You may be wondering what is the necessity to disable touchpad. In general, it’s mandatory. But, mouse connectivity are of two types- One is the wired connectivity via USB cable. The other is the wireless mouse. For wired mouse connectivity, the computer can easily detect the connection, and the touchpad automatically gets turned off. But for wireless mouse, the computer cannot always detect the situation and turn off the touchpad. In that case, you can manually disable touchpad.
In case of a wireless mouse, there is a dongle that you need to connect to your laptop. Most users leave this dongle connected and use the mouse whenever they want. After a definite period of inactivity, the mouse stops responding until you double-click it. If you connect the dongle of the wireless mouse, the touchpad will remain disconnected. The following tutorial will take you through some easy steps to disable touchpad when a mouse is connected in Windows 10.

Steps To Disable Touchpad When A Mouse Is Connected In Windows 10
1. Open the Start Menu.
2. Go to Settings.
3. Click on Devices.
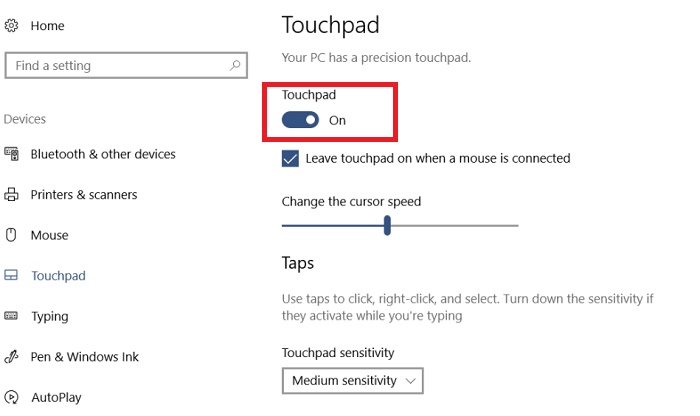
4. Now in the left panel, go to the Touchpad tab.
5. Now that you have connected a mouse with your laptop, you can turn off the touchpad. So, in the right pane, you will find an option called “Leave Touchpad when Mouse is connected”. Uncheck the option.
6. That’s all!


amazingly explained!! keep sahringg setting really clear and understandable.
Thanks
Completely inaccurate. Nothing mentioned after step 4, including the illustrations, is valid. I can’t find any of it.